 |  |  |  |  |  |  |
|---|---|---|---|---|---|---|
 |  |  |  |  |  |  |
 |  |  |  |  |  |  |
 |  |  |  |  |  |  |
 |  |  |  |  |  |  |
 |  |  |  |  |  |  |
Click on a picture in the gallery above to see a full resolution image, or to navigate manually
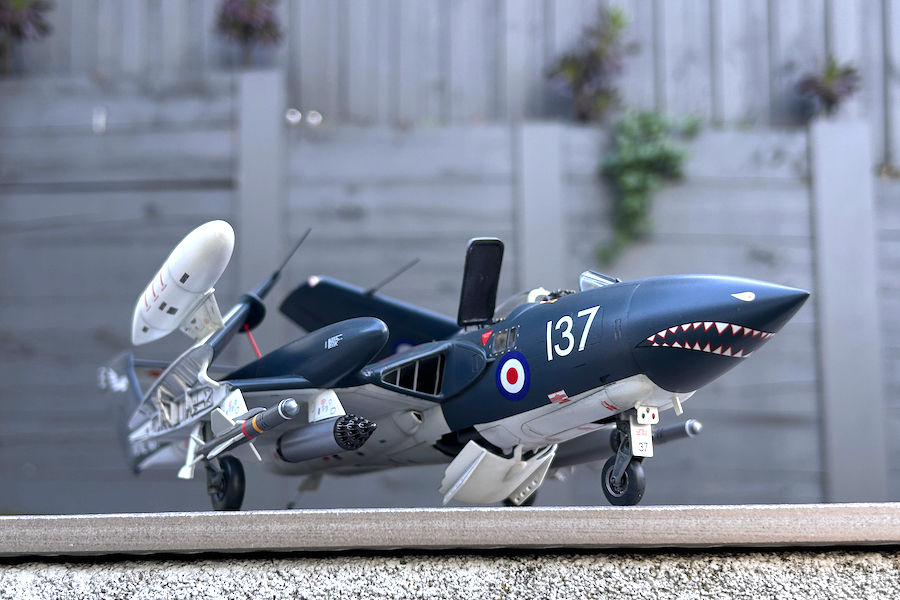
de Havilland Sea Vixen FAW.2
No.899 Naval Air Squadron
HMS Eagle, March, 1975
1/48 Airfix
Why this plane?
The unique looks of the Sea Vixen have intrigued me for a long time. A proper mixture of elegance from some angles, and goofy looks from others. I think they are a proper representation of a golden age of British aviation, when things were allowed to be "a bit different". The Airfix kit comes with 4 decal options, and among these I went with the one that had the iconic flying fist in the tail, and the shark mouth.
What was added
-
This was pretty much built from the original kit, no resin or photoetch. In part because the Airfix kit is so good. Thus, the only changes I made were:
-
Seatbelts were created from Tamiya Masking tape.
-
Some detail got sanded out in joining parts, so engraved panel lines had to be re-scribed in several places.
-
Tungsten rods were used to represent some detail on top of the booms. There were like piano hinges, for the equipment bays (see here).
-
The seeker heads of the Red Top missiles were made from blobs of Micro Krystral Klear, after losing the original clear parts.
-
Notes and lessons learned
Considering the popularity of the brand, it is perhaps strange that this was my first Airfix kit. But now, I am positive about doing others. Sure, it could use some refinement. For example, the antennas and missile fins are thick, and if it wasn't for the "out of the box" aspect I would have used some metal substitutes for better scale effect. But overall the fit between parts was good, the instructions were clear, the decals did what they were supposed to do. This was a relatively smooth journey, but a few notes of caution if you want to build the same kit:
-
The decision to represent the plane on the ground with the wings folded added a lot of complexity. In the Sea Vixen a relatively large part of the wing could be folded, making the wing sub-assembly heavy. Joining that to the fuselage/ wing root sub-assembly relies on two relatively flimsy brackets, and keeping them aligned and held long enough to obtain a firm bond is a job better suited for an octopus (preferably one with tiny opposable thumbs at the end of each arm). Adding the subsequent bits of the wing folding mechanism is also complex, and it is difficult getting the two wings to be at the same angle. I have no real solution for this other than trying again and again, until it worked. This included breaking first attempts, and starting over. For an easier job, consider showing the wings deployed.
-
As it often happens, it is in the small details that a lot of time is spent. In my case, it was the pitot probes the caused issues. These are extremely flimsy, to the point that removing them from the sprue without breaking becomes a problem. And when you do manage to get them out, sanding to a smooth uniform appearance becomes another challenge. I circumvented this by dipping the part in resin, and using UV to cure. This worked pretty well. The process could be repeated several times, gradually building up stiffness, until the pitot probes could be sanded to a sharp tip. But, in the end, I opted to use some blunted hypodermic needles for extra stiffness.
Painting and effects
-
Priming: SMS Grey surfacer (PLP01).
-
Upper surfaces: SMS Extra Dark Sea Grey (EDSG; PL222), followed by irregular application of diluted Mr Color EDSG (333) and Vallejo Model Air Dark Sea Grey (71053). The hues from these manufacturers are slightly different, which adds some variation resembling weathering. Paintbrush-applied Model Air 71053 was used to fix spots, sometimes diluted with water.
-
Lower surfaces: SMS white surfacer (PLP03), followed by irregular application of SMS Insignia white and Mr Color Character White to add variations. Paint-brushed Vallejo Model Air Insignia White (71279) was used to fix spots, sometimes diluted with water.
-
Interior of bays, ducts: Depending on the references, I used either Tamiya Light Sea Grey XF-25 or SMS white surfacer. Note that the instructions suggest Humbrol 34 (flat white) for one side of the wing folding mechanism interface, and Humbrol 87 (steel grey) for the other. This was not apparent in the pictures I could find, where the colours looked the same on both sides. I went with the white.
-
Undercarriage: Tamiya Light Sea Grey XF-25
-
Folded wing supports: Tamiya insignia red.
-
Before decals: SMS Clear Gloss PL09.
-
Panel lines were then highlighted with enamel washes created from various Tamiya metallic paints including X-10, X-11, X-33, XF-56.
-
Finish used mixed “satin” coat, created by mixing equal parts of SMS Flat Clear (PL10) and Clear Gloss (PL09).
-
The main paint for the missiles was Alclad 117 Dull Aluminium. For the rocket pods the body is Alclad 119 Airframe Aluminium, and the tips and rockets are Alclad 120 Gunmetal. These were later sealed with SMS PL58 Super Clear, before and after decals.
-
The main paint for the cockpit was Mr. Color 40 (German Gray). Detail was brought out by dry brushing Tamiya metallic enamels (X-10 and X-11).
-
I used a mixture of "Middle shading" (see here) and post-shading, in both cases done with Tamiya Weathering master powders applied with paintbrushes. The main colours used were Oil Stain, Burnt Blue, Rust, and Soot.
-
Clear parts were coated with “Looks like Glass” from Deluxe Materials.

Plane: de Havilland Sea Vixen FAW.2 Kit manufacturer: Airfix Scale: 1/48 Modeller: Marcello Rosa www.marcellorosa.com
Plane: de Havilland Sea Vixen FAW.2 Kit manufacturer: Airfix Scale: 1/48 Modeller: Marcello Rosa www.marcellorosa.com

Plane: de Havilland Sea Vixen FAW.2 Kit manufacturer: Airfix Scale: 1/48 Modeller: Marcello Rosa www.marcellorosa.com
Plane: de Havilland Sea Vixen FAW.2 Kit manufacturer: Airfix Scale: 1/48 Modeller: Marcello Rosa www.marcellorosa.com
Click on a picture in the gallery above to see a full resolution image, or to navigate manually

Airfix 1/48 de Havilland Sea Vixen FAW.2 Model built by Marcello Rosa www.marcellorosa.com

Airfix 1/48 de Havilland Sea Vixen FAW.2 Model built by Marcello Rosa www.marcellorosa.com

Airfix 1/48 de Havilland Sea Vixen FAW.2 Model built by Marcello Rosa www.marcellorosa.com
Airfix 1/48 de Havilland Sea Vixen FAW.2 Model built by Marcello Rosa www.marcellorosa.com
Click on a picture in the gallery above to see a full resolution image, or to navigate manually
Construction steps
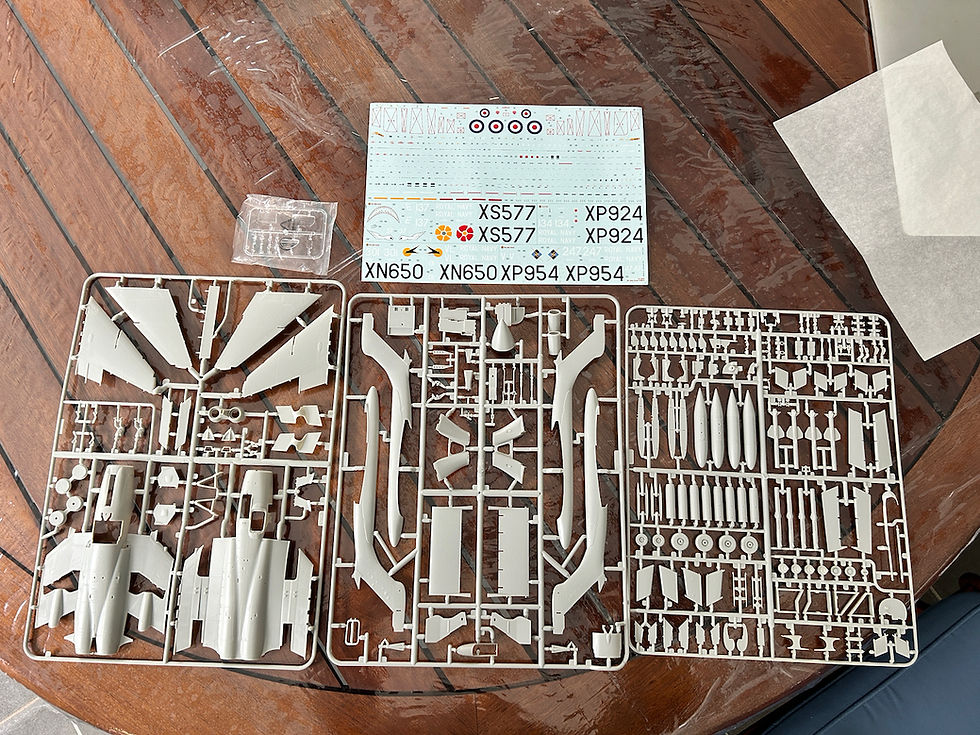
Box contents.
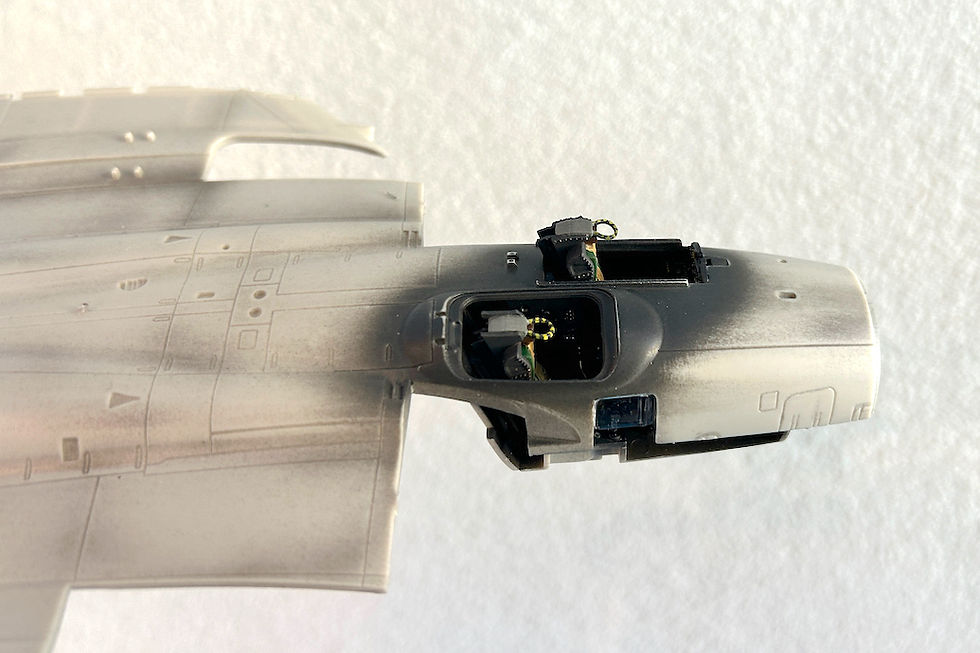
After the cockpit is assembled

Major parts done, ready for clear, decals and weathering.
Box contents.
Click on a picture in the gallery above to see a full resolution image, or to navigate manually
-
All parts come in 3 gigantic sprues, and a small clear one. The decal sheet is also very impressive, including all stencils and markings for 4 versions.
-
Once the cockpit was assembled (see below for details), the next job was to fit it to the top of the fuselage. Barely visible here is the observer window. Getting this aligned was a very fiddly job, which became apparent only when I tried to join the top and bottom as in the next image.
-
Then one has to assemble the intakes and exhausts. The intakes are actually very fiddly when it comes to trying to get seamless appearance.
-
Joining the top and bottom halves off the fuselage required a lot of sanding to avoid a visible step. As you can see, this involved res-scribing some of the detail. Here I managed to get the observer's winding flush, but this involved several attempts and, yes, a lot of sanding. The white outline is from Vallejo putty. For this and a few subsequent stages I lightly glued (with Micro Krystal Klear) the airbrake door closed, to avoid accidentally painting the interior.
-
Integrating the exhaust covers was another important job, which required a sanding and some re-scribing. The natural alignment of the parts was not particularly good.
-
A ventral view of the main assembly after adding the nose and booms. Visible here are also the undercarriage bays, masked (after painting the internals) with Abteilung 502 liquid mask and some tape. This photo was taken after a few cycles of priming, each revealing imperfections that needed to beg addressed. You can see evidence of sanding in various places that did not fit flush with each other.
-
Dorsal view of the same stage as in image 6.
-
Finally, when everything felt square, what I hoped was the last cycle of priming, using SMS surfacer grey.
-
At this stage the wheels were added, and white surfacer was used in the bottom. Each undercarriage was assembled separately and integrated at this stage. This meant masking them for subsequent steps.
-
Appearance of the ventral surface after pre-shading with Tamiya Weathering Master powders, and a coat of SMS white surfacer. Now I opened the airbrake and fixed it in place.
-
Getting the right appearance was not a linear story. As you can see here I thought that more shading was needed, and opted to do "middle shading" even after the first layer of Extra Dark Sea Grey (EDSG) was done to the tops. This involved additional complex masking, as shown in image 13.
-
After I felt that the white bottom surface was "just right", it had to be masked to allow the grey surfaces to be re-painted.
-
Then it was time to assemble the wings.
-
Major assemblies completed, but still fighting with the painting. Here visible are some of my early attempts to introduce variation to the EDSG by using Mr. Color in addition to the SMS base. You can see that the EDSG form the 2 manufacturers was a bit different.

The kit's ejection seats after addition of belts made from Tamiya tape

Upper view of the pilot station before seats are added

Very little can be seen once the model is completed, even with the open cockpit display
The kit's ejection seats after addition of belts made from Tamiya tape
Click on a picture in the gallery above to see a full resolution image, or to navigate manually
The cockpit
This is what the cockpit looks like out of the box but with seatbelts added (from masking tape). The colours used for the different instruments were based on photos from various "walkaround" web sites.
The Sea Vixen's cockpit interior is supposed to be flat black, which makes it hard to make look interesting. I opted for going with Mr. Color 40 (German grey) which is pretty dark indeed, but allows some if the detail to be visible. Some of the details were brought out by dry brushing Tamiya enamel metallics (X-11 chrome silver) and other greys. Even doing this, it was very hard to take semi-decent photos.
Keeping in mind that very little will be visible if one decides to build the model with a closed cockpit...