|  |  |  |  |  |  |
|---|---|---|---|---|---|---|
 |  |  |  |  |  |  |
 |  |  |  |  |  |  |
 |  |  |  |  |  |  |
 |  |
Click on a picture in the gallery above to see a full resolution image, or to navigate manually
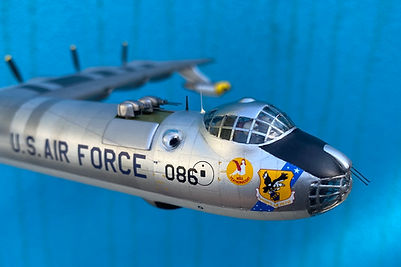
Convair B-36D Peacemaker
7th Bomber Wing
Carswell AFB, TX, early 1950s
Why this plane?
I am fascinated with huge, complex machines, and on this respect it is hard to beat the B-36.
The late 40's and early 50's were a time of rapid progress in aviation, when seemingly everything that seemed possible was attempted, and many unusual airplane designs were made operational. The B-36 was an icon of this era: the largest airplane of its time, with six radial (propeller) engines and 4 jet engines. As evident in the surviving footage (including the excellent movie "Strategic Air Command", it was a sight to behold (see for example the remastered high-resolution footage I used as reference, here.
By never firing a shot in anger, it superbly fulfilled its mission of being a deterrent to any potential enemies for over a decade.
What was added (or changed)
-
The only purchased upgrade was a set of decals from Caracal. Even though I tried to stick to "out of the box" as much as possible, the decals that came with this kit were truly awful, being below the expectations of even the most steadfast budget modeller. After having spent so much time making this model look acceptable (see below), I decided not to waste the all the effort by using blurry decals.
Original decals: Left: The blurry unit badges (decals 64-69) and oversized propeller markings (62) give some idea of the problems with the coloured decals. Right: the black decals, including walkway demarcations, are a bit sharper, but lack detail. Some of the written stencils are reduced to collections of random dots (see. for example decals 20, 42-45). For higher resolution views, open images in separate windows.
-
I think the B-36 is one of those planes that look magnificent in flight, but not so good on the ground. I decided to build this model to represent a B-36 in flight...and then realised that the kit makes no provision for this. Some of the wheel well doors had to be fashioned from Evergreen sheets. To give this large model some stability I also had to purchase a stand with a wide base, from Academy.
Other additions were home-made, including:
-
The gun barrels for all 20 mm turrets were all substituted with segments of tungsten wire, which seemed more appropriately scaled. I realise it is hard to create 1/144 styrene parts with the appropriate diameter (~0.2 mm!), but the kit originals were not only too thick, but also longer than they should have been, based on contemporary photos.
Adjustments to the 20 mm guns. Upper left: One of the original parts (top) next to 2 of the tungsten wire segments used as gun barrel replacements. These were subsequently painted with Tamiya X-10 Gun Metal. Upper right: Inserting the metal gun barrels involved clipping the plastic parts, and drilling with the finest pin vise in my set. Bottom left: The turrets assembled. Note the amount of filler (white) needed to fill gaps and mould sinks. Bottom right: Comparison with the real thing (image credit: https://forum.warthunder.com/index.php?/topic/341898-b-36-peacemaker/).
-
Antennas were created with cut tungsten wire and stretched sprue, and rigging was added using UNI-Caenis fly tying thread.
-
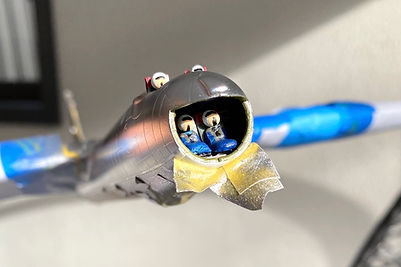
I usually include some pictures of the cockpit to give some idea of the level of detail you can get out of the box. For this kit the level of detail is...zero - there is nothing provided for anything inside. I realised soon enough that it would be silly to model a plane in flight without anyone in control, so proceeded to create some very, very basic interior from cardboard and Milliput. Not really a work of art, but sufficient given how little one can see through the very thick clear parts.
Adding a crew: This kit had no parts corresponding to anything inside, so I had to improvise a crew if I wanted to represent a B-36 in flight. Admittedly, I did not aim very high, given how little you can see through the thick plastic of the clear parts, and the scale. Top row: Basic seats made from cardboard, and figures sculpted with Milliput. Middle row: crew figures fitted in their places. Bottom left: A basic representation of instrument panels was added, which unfortunately (or fortunately) no one will ever be able to see. Bottom right: Final result; just enough to suggest there is someone inside...
Notes and lessons learned...
I started this thinking it would be a nice, relaxing quick build. New mould, good reviews, so what could possibly go wrong?
Well, quite a lot actually, and here I am six months on, finally managing to call this one done. In brief: this is not an easy kit.
-
Basically every single joining needs filler (see below for examples), and there is a lot of sanding involved. Remember those nice recessed panel lines you read about in the "in box" reviews? Consider them just guides for re-scribing. By the time you finish most of them will be gone, and substituted with the ones you create. Building this kit means more than 50% of your time is spent sanding, with the rest being divided into filling, scribing, masking, and only a minor portion cementing things together. It drove me crazy, to the point that at a certain stage I gave up (first time since I started in the hobby) and bought a second kit during a sale, with the intent to start over again. In the end sanity prevailed, and now I will have the chance to complete the second kit as an early B-36 (perhaps!).
-
One issue I had was that the innermost nacelle in the starboard wing was somewhat mis-shaped, looking "deflated" in comparison with the port one. This must have been just bad luck, as the second kit I bought did not have this problem. Anyway, in the end I decided just to go with it, but the eagle-eyed maybe able to see it in the photos of the completed model.
-
This was my first experience with attempting a natural metal finish. It was a steep learning curve, not helped by the fact that I chose a complicated scheme with metallic on top, and anti-flash white in some parts of the bottom surfaces. This meant a lot of masking.
-
The anti-flash white bottom surfaces were done first, using SMS white followed by a bit of insignia white (trying not to be too precise, to create variation).
-
Pictures of the B-36 suggest two main characteristics of the metallic finish. 1) The crew compartments (aluminium, front and back) look more reflective than the middle parts (magnesium), and 2) there is some variation in shade and reflectiveness between panels. I tried to evoke similar impressions by using different Alclad paints, applied in light coats, and by using different final coats after the decals (Vallejo semi-gloss for most of the wing and fuselage, Pascoe floor polish for the front and back crew compartments).
-
-
The main concessions to "weathering" were in the form of not being too obsessive about fixing small specks, scratches and imperfections in the paint. Being a novice to this scale, I found that my initial attempts to creating a weathered look using the techniques that worked at 1/72 looked like unnaturally huge smudges. I hope that this "natural" approach will have reached some balance between the model not looking entirely like a toy, and also not like a plane so badly maintained that would have brought shame to the crew. Panel lines were, in some places, slightly enhanced by running a pacer along them. Oil stains in the engine nacelles and horizontal stabilisers were added where most obvious, based on multiple viewings of "Strategic Air Command".
...and more pictures...
Click on a picture to see a full resolution image, or to navigate manually
In summary...
I really wanted a B-36 in my collection, and the Roden kit did provide me with the materials to build a correctly shaped one - albeit almost driving me crazy, in the process.
Unless you have the space to accommodate one of the increasingly rare 1/72 Monogram kits (I don't), and the willingness to splash money in litres of metallic paint (also not me), this is the best option available. Just don't think it will be a quick and relaxing build.
Click on a picture to see a full resolution image, or to navigate manually


Construction "highlights"

Very early in the build, a taste of things to come. The bridges between the sprue and wings are such that there is no way to avoid damage.

Joining the engine intakes to the leading edges of the wings. This is typical of the quality of the fitting. Bring out the filler...

Painting a few more frame lines, this time the longitudinal ones. Here the previously painted frames had been "stabilised" with a hand-painted layer of Alclad Aquagloss, before masking in a different direction.
Very early in the build, a taste of things to come. The bridges between the sprue and wings are such that there is no way to avoid damage.
Click on a picture in the gallery above to see a full resolution image, or to navigate manually