 |  |  |  |  |  |  |
|---|---|---|---|---|---|---|
 |  |  |  |  |  |  |
 |  |  |  |  |  |  |
 |  |  |  |  |  |  |
 |  |  |  |  |  |
Click on a picture in the gallery above to see a full resolution image, or to navigate manually
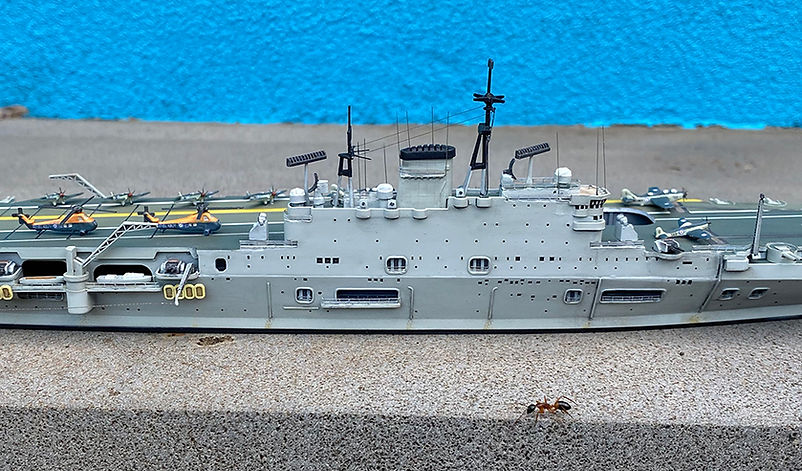
RN aircraft carrier HMS Eagle (R05)
Mediterranean sea, mid-1950s
Why this ship?
I always liked the tough, no-nonsense look of the British armoured carriers, designed for survivability. The Eagle (R05) and Ark Royal (R09) are the ultimate expression of this concept, incorporating many hard-earned lessons from World War II.
What was added
-
The only aftermarket item was the 1/700 BigBlueBoy British modern railing set, which I found good, and affordable. As detailed below, I used this not only for the normal purpose (railing), but also to help restore the 40mm AA gun mounts and to make aircraft propellers.
-
The various aerials around the island were made from 0.125 mm diameter tungsten wire, which I was lucky enough to get from a pile of things that were being thrown away by a work friend... For reference about their placement (and many other things) I used a wonderful 3-D model available here.
-
Rigging was done with human hair.
-
There were no decals for the flight deck, and the only decals provided for the planes and helicopters were roundels which were way too large (probably adequate for 1/350 scale...). So, all had to be created in Adobe Illustrator and printed on Experts Choice decal film (white for the roundels and deck markings, and clear for the aircraft numbers).
-
This was my first attempt to add an ocean diorama base, depicting the Eagle at high speed.
Problems circumvented
The kit was really old
I really wanted to build one of the carriers of this class, and soon learned that the 1/700 Fujimi kits of the Eagle and Ark Royal were the only game in town - even though they have been discontinued long ago. Thus, I decided to risk buying a second-hand, "vintage" kit from eBay. This was the beginning of a love-hate relationship. In the end, I found the kit I needed, and the result was OK (I think). But it was a rocky road. As far as I can determine from online sources, my kit was from the 1976 vintage. I got it for a bargain price ($29 AUD), but, as usual, you get what you pay for...
-
The first issue I had was with the quality of the kit itself. I think I have become spoiled by buying recent stuff, but it is easy to forget how much progress has been made by kit manufacturers. Basically, this kit had lots of ejection sinks and pins. The most notable problem was right on the flight deck (including a huge sink around the elevator well), but there was also a lot of filling and sanding to do, including in delicate parts such as the aircraft and masts. Needless to say, lots of flash to trim, too.
-
Compounding on this, the plastic was really brittle. I can't blame this on Fujimi, since it is possible that this was a result of 40 years in a box. This required extra care cutting the parts from the sprues, and removing flash. I actually broke the flight deck into two, when sanding, just by holding it with a bit stronger grip than usual - that's how brittle it was (see below under "construction photos"). But the biggest problem was with the tiny gun barrels of the sextuple 40 mm Bofors mounts - they seemed to break off just by looking at them. In the end, I broke so many during construction that I decided to re-do the whole set, making the barrels with hobby wire and glueing them one by one in leftover photoetch, using cyanoacrylate. If you are planning to build this kit, my advice is not to to follow the instructions for steps 6-10: build the AA gun mounts separately, and keep them in a safe place until the final assembly (preferably together with the equally breakable radio masts, parts 51). In any case, this gave me the chance to correct the arrangement of the gun barrels: in the kit they appear in two columns of 3, whereas reference photos show that they were more like 3 pairs: two to the left and right (on top of each other), and one arranged horizontally near the top.
6-barrel assemblies for the 40 mm Bofors, built by glueing hobby wire to strips of leftover photoetch. These were subsequently glued to the plastic gun mounts with cyanoacrylate. An example of the final product can be seen in the photo below.
-
Finally, the worst part: Two very visible parts were missing from my "vintage" kit, which had to be scratch-built: part 18 (the uppermost level of the island, above and behind the bridge) and one of the Bofors mounts. Evergreen strips came to the rescue, and I managed to create reasonably good versions, shown in the picture below.
The scratch-built 40 mm gun mount and superstructure parts, in final versions
Finding the right colours
One of the hardest aspects of building this kit was the relative lack of good photos documenting the Eagle's changes of appearance over the years. There are many great photos particularly in the Imperial War museum's web site (keep in mind which Eagle you are looking for) but there is a bit of detective work involved in reconstructing the time line. For example, the big identifying letters in the deck changed from "J" to "E" , and the island gained the R05 pennant numbers, at some point between 1955 and 1959 (when this ship already had an angled deck, but before the major refit that included installation of the Type 984 radar). My model keeps the "J", thus representing the ship some time just after the 1955 installation of the angled deck.
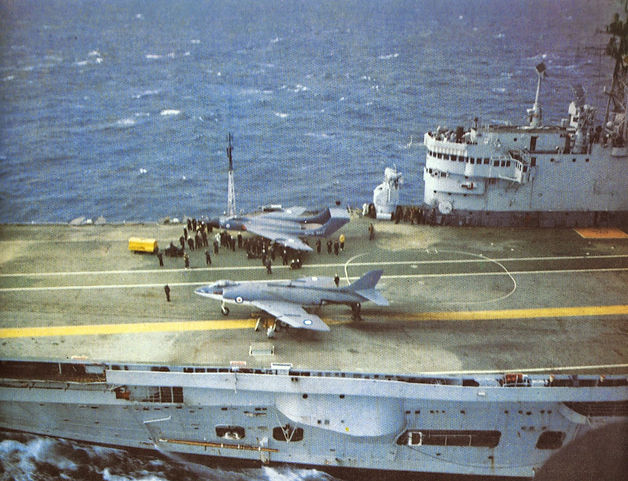
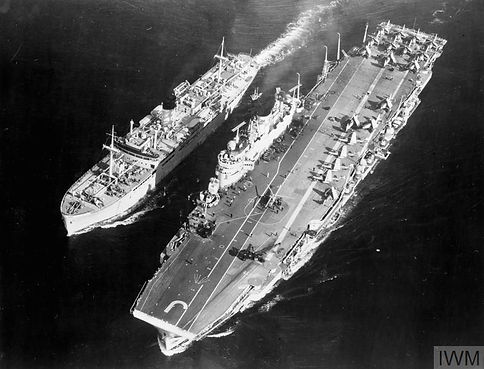
The instructions in the old Fujimi kit were very minimal with respect to colours, and, as far as I could determine, incorrect. As shown here, the flight deck was simply described in terms of dark vs. light grey with a white landing strip, with the light grey part ending abruptly behind the fore 4.5" mounts. In the few reference photos of that time (like the one below, from sister ship Ark Royal) there seemed to be a lot of anti-slip green, the landing strip was yellow (as also seen here and here), and the angled deck markings continued all the way to the bow end of the deck. I went with my interpretation of what was going on, mixing paint until I thought the colours were a reasonable representation of what I could see in these pictures...for the record here are the colours I used:
-
Majority of the flight deck (greenish surface):
-
Angled deck landing area (greyish surface):
-
Other hull and island surfaces:
The Ark Royal flight deck in the corresponding period (image obtained here)
The fit was far from good
This could have been expected from the age of this kit, but some of the problems were in a different scale, compared with my A-10 experience, and nearly derailed the build. For example,
-
The hull part comes as a single piece, which facilitates a lot. But the waterline was arched: with the bow and stern touching a horizontal surface, the midships section was raised by a couple of millimetres. This was also reported by this modeller, so it is probably not just an effect of the old plastic warping. Fortunately I had his advice to follow, and used the metal weights that come with the kit to stiffen the waterline piece first, followed by clamping during the process of glueing it to the hull.
-
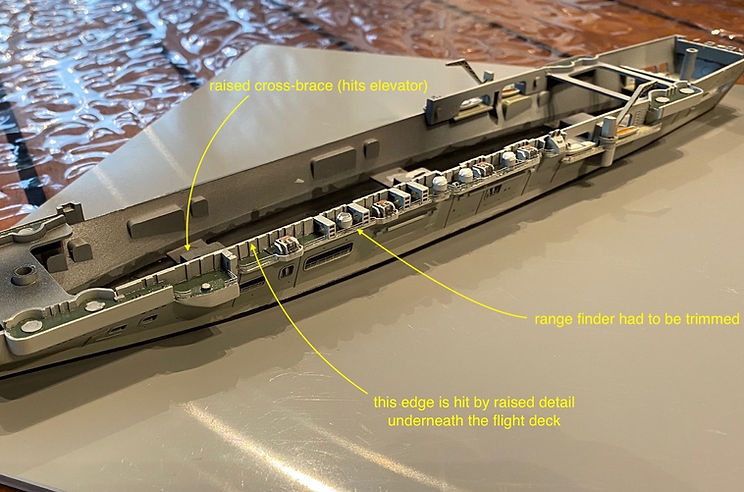
The fore aircraft elevator can be positioned level with the flight deck, or down at the hangar level, using a piece provided to simulate the elevator well. I opted for the latter, but this became a problem when it was time to join the deck with the hull: the hull part has some cross-braces at its bottom (see picture below), and one of these was right where the "down" elevator ought to be. Some nerve wrecking work had to be done with the Dremel to make a niche (while fully expecting the old plastic to crack at any moment...).
Problem regions when joining the hull and deck assemblies
-
In addition to the elevator problem mentioned above, I had two other problems aligning the decking hull assemblies. First, the upper edge of the part representing the fore port side sponson (where one of the searchlight assemblies goes) met some raised detail on the bottom of the flight deck piece, preventing proper alignment. Again, the solution was some Dremel work. Second, one of the range finder covers (the white hemispheric things in the picture above) ended up too high, hitting the bottom of the flight deck, and required some sanding. The instructions recommend that the range finders and searchlights be glued in place before the flight deck and hull are joined (steps 8-10). In reality all these small detail parts are best left to the final assembly, facilitating not only applying the "deck green" colour to the sponsons (where these parts sit), but also the tricky job of joining flight deck to the hull. Just make sure you don't put the railing before they go in.
The kit was inaccurate in one obvious way
I will end my list of misadventures with the one problem I could not solve. Comparing the pictures below, there is a clear difference with respect to where the white lines meet the edge of the flight deck. The reason for this, as far as I could determine, is that the angle of the angled deck is incorrect in the model. This proved too difficult to fix, primarily because it would be hard to hide a big seam line that comes from the flight deck being in two parts (see here). This seam can be hidden quite effectively by having the yellow landing strip follow it, but not otherwise.
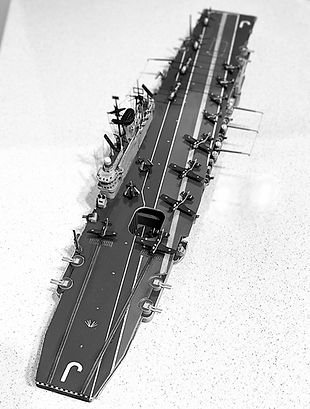
The real HMS Eagle vs. the Fujimi model
Despite the pictures above giving the impression that the model's flight deck is narrower than it should be, this is an effect of perspective: the length/ width ratio of the model's flight deck seems accurate, in comparison with online sources, so in principle it would be possible to sand out all deck details, and start with a blank canvas. But given how fragile this plastic was, I decided not to risk it, and went with the kit's raised details, after some sanding to make them less intrusive. Following that, all deck lines were done by masking and airbrush. The big "J"s, the fore deck "wind rose" and the distance markers were made from white decal film.
Notes and lessons learned
I am happy I had the chance to build a few kits before this one. The combination of and old kit and working on the tiny 1/700 scale for the first time could have been a disaster. I've heard that Fujimi kits have improved a lot, and I hope to have a chance to try one something more recent in the future. In the meantime, there is a clear gap in the market for an updated kit of the Audacious class carriers.
In closing, a photo that conveys the scale (of course, you could argue that things tend to be bigger in Australia).


 detail flight deck and gun starboard |
|---|
 Wessexes 2 |
 Wessexes 1 |
 Fore deck |
 Gannets |
 Sea Furies |
 Seafires |
Click on a picture in the gallery above to see a full resolution image, or to navigate manually
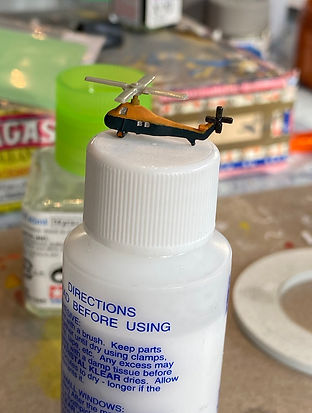
The rotors provided in the kit
Aircraft
It has been pointed out (for example here and here) that the air group in this kit is not historically accurate: the Supermarine Seafire and Hawker Sea Fury did not overlap in time with the Fairey Gannet and Westland Wessex. The solution would be to buy aftermarket jets, but I baulked at paying more for 3-D printed 1/700 planes than I paid for the kit. Besides, after waiting >40 years in a box, I simply did not have the heart to leave the Seafires and Furies out. So they are all there. Maybe on this day the Eagle was ferrying some old stuff. To minimise the chance of future problems, the planes were fixed to the deck using Micro Krystal Klear instead of cement.
The planes provided were pretty basic, and as mentioned above the decals for the air group consisted only of British roundels, too big by a factor of 2. So I had to make my own using decal film and a laser printer. There were also no propellers, so I made them by glueing individual pieces of railing. The Gannets had 8 blades (2 x 4 counter-rotating), the Seafires 6 (again, 2 x 3 counter rotating; I assumed a late Mk47 model), and the Sea Furies 5.
The colours used for the planes were XF-50 field blue, for the upper wings and fuselage, and a mixture of XF-56 IJN grey green (4x) and XF-2 white (1x) for the lower surfaces.
By far the biggest challenge were the helicopters. There were deep mold sinks on the sides, and the rotor blades provided in the kit were very inaccurate, as seen in the picture to the left. New blades (longer, thinner) were made from Evergreen strips (#100), and the rotor "head" was clipped at its base to allow a more natural distance. Finally, because the stencils were white on dark blue, they had to be made in white decal film, with printed white letters on a near-matching blue background. Finding the match was the trick, and this took many attempts. A lot of Microsol later, and with some weathering, the "ROYAL NAVY" and number stencils seem to blend OK, from a distance at least. The instructions request "yellow-orange" for the upper part of the fuselage, and this does not seem far from the images from the Imperial War Museum collections (like this one), if one accounts from some fading. The lower part was also painted in XF-50.
Diorama sea base
After completing the model I came across videos like this one, which teach techniques for creating an ocean diorama base for waterline models.
I pretty much followed the video tutorial. The only supply that was different was the acrylic gel, which I sourced from a local company (Global Colours Professional Regular Gel Gloss).
This technique is so good that even noobs like me can do something decent in their first attempt.


Construction photos
-
Deck parts joined, filled and undercoated with diluted Mr. Surfacer 1000. Note the really heavy raised detail, which I subsequently sanded down a lot.
-
Detail showing some problems in the front part of the deck, where you see two nasty mould ejector sink marks. A rectangular one, corresponding to the region where the elevator well attaches (from underneath), and circular one, between the catapults.
-
After some filling and sanding, the flight deck is painted. If you squint you can see where I managed to break the deck into two, just near where the yellow landing strip ends. A lot of sanding and filling later, the result is almost imperceptible. This has also helped reduce the problem with sink marks.
-
Deck markings added, and all coated with floor polish to seal the decals in.
-
Hull section painted: undercoats, followed by Tamiya acrylics. Note that the waterline is not level; this required some "straightening" before joining to the flight deck.
 |  |  |  |  |
|---|