 |  | #/media/File:Kruiser_Hr.Ms._De_Ruyter_(C801)_(2097_097_041981).jpg) | 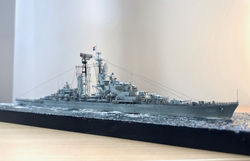 |  |  |  |
|---|---|---|---|---|---|---|
 |  |  |  |  |  |  |
 |  |  |  |  |  |  |
 |  |  |  |  |  |  |
 |  |  |  |  |
Click on a picture in the gallery above to see a full resolution image, or to navigate manually
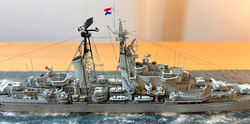
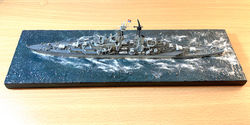
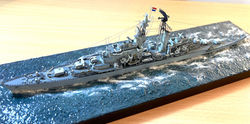
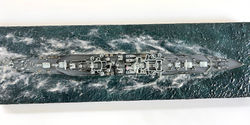
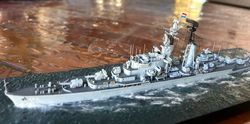
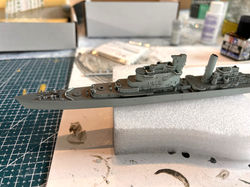
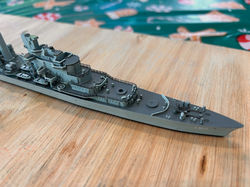
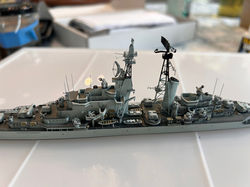
HNLMS De Ruyter (C801).
North Atlantic, 1953
Why this ship?
To put it simply, I consider this Dutch Cold War-era cruiser one of the best-looking ships ever. The fact that she survived to be the last all-gun cruiser in service anywhere in the world (following transfer to the Peruvian Navy, as the Almirante Grau) adds some historical significance.
Demonstrating once again that we amidst a golden age in scale modelling, we can now get a kit of what would be normally a very niche subject. The kit is from Doggy Industries (who define themselves as "a small workshop operated by Liu and his friends in part time").
What was added
This was essentially an out-of-the-box build. Other than paint and cyanoacrylate glue, all I needed to add was rigging, which was done with Uschi elastic thread. This choice of rigging material was important in this case, as the masts are really fine, and any less elastic line would pull them out of shape. A sea base was also added using the same technique I learned when building the 1/700 HMS Eagle.
Lessons learned and problems circumvented
-
The out-of-the-box aspect was made an easy choice by the comprehensive nature of the kit. In addition to the resin parts, it comes with 3 extensive frets of photoetch parts, metal barrels for the main guns, and decals for pennant numbers and flags. Not being one that hesitates in adding my own touches, in this case it was hard to find something that needed adding.
-
I will not mince words here when I say that this kit set for me a new standard for what to expect in terms of photoetch. The detail is fine, yet the metal is easy to cut with a standard scalpel blade, and to work with. Every single door and hatch is represented as a separate part, and can be modelled open or closed. Every single vent is there. Forget about generic railing: every section is individually numbered, and has clear bend marks which fit precisely in the place it is meant to go. What is more, insofar as I could find from the photos available online, every detail represented is accurate. The amount of research that seems to have gone into this kit is mind-boggling. Sure, building this kit means having to position, and in many cases bend, dozens of sub-millimetre parts - but the results are satisfying.
-
The photoetch is also impressive in terms of the number of spare parts you get. All common offers to the carpet monster are there, so the level of stress in the build was much reduced: why spend hours on your knees with a magnifying glass and a lamp, when you can just to to the "general parts" sections of the frets and get a new part? There is also enough spare railing for another ship. In summary, on the basis of the photoetch alone, I felt that I got my value for money.
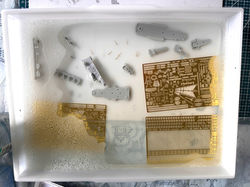
What you get out of the box: Image 1: box art. Images 2 and 3: The components come in good packaging, with the small parts in individual zip lock bags, the photoetch frets in sturdy plastic sandwich backing, and the whole lot supported by foam to minimise shaking during transportation. Image 4: The three photoetch frets. Most of the railing you see on the right side fret is spare. Image 5: some of the resin sprues after unpacking.
- Having talked about the positives, now a few caveats. The resin parts are sharp and detailed in general, but need some work to bring them to the same level as the photoetch. I had three types of problems, two of which were solved satisfactorily, and one not so well.
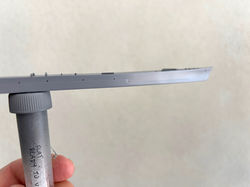
- First, there was some oblique patterning in large parts, like the hull, which was hard to eliminate, even after multiple layers of Mr. Surfacer. This is hard to capture in the camera, but the image below will give you some idea of what I mean. Nothing that some sanding can't fix, right? But the resin was noticeably harder to work with, for example, in comparison with that I had to work with in Niko Model's USS Philadelphia. Nonetheless, in the end, more robust sanding did fix the striping.
- But this leads me to the second issue. The tough nature of the resin also meant that it was difficult (impossible?) to reshape the larger parts, when required. Don't get me wrong, most parts were good enough. But there was a terribly warped part of the aft superstructure which, despite multiple immersions in hot water and strong clamping, never managed to fit well.
The least satisfactory issue with this build: Level 2 of the aft superstructure could not lay flat. This image shows the result of trying to join the front end of the part; note the visible gap at the back. Immersion in hot water never managed to fix this problem, and strong clamping only helped to a little extent. Unfortunately, the use of filler was also difficult at this stage, after application of all doors, vents and hatches. If I ever tried this again (famous last words...) I would have glued all parts of the superstructure together first, before applying all photoetch. but then again, this would make masking to paint the decks much harder...
-
The third problem was that the kit came one part short of the number required. Specifically, there were 7 copies of part R4 (the base of the 40mm Bofors mounts), instead of 8. I am happy to report that contacting Doggy Industries through their Facebook page got me a prompt reply, and the missing part was quickly sent from China free of charge.
-
I could not find accurate records of the appropriate paints used by the Dutch Navy in the 1950's. The few colour images that made to this day suggest a very light grey with some blueish tint for the vertical surfaces, and dark greenish grey for horizontal surfaces. To make things more complicated, none of the images I found was from above. Therefore, some guesswork was required.
-
In the end, I felt that it was reasonable to use airbrushed SMS Light Admiralty Grey (PL169) for the hull and vertical surfaces. This turned out to be a lucky choice because it could be touched up when necessary with a paintbrush, using AK Air 3rd generation ADC Grey (the difference being imperceptible).
-
For horizontal surfaces, the choice was airbrushed Mr. Color 36 (grey green).
-
Everything was sealed with airbrushed SMS clear gloss (PL09) before applying decals, and then a mix of 50:50 PL09 + SMS flat clear (PL10) when fully completed, including rigging.
-
-
One last thing worth mentioning. The kit comes with 3 copies of the fire control radars (I believe) for the secondary (57mm) armament. This would be appropriate for De Ruyter as commissioned in 1953. However, a fourth mount was soon installed, just ahead of the bridge, and this appears in most photos of the ship. To make things confusing, the instructions call for the installation of this fourth radar, which is not provided. I solved this problem by sending a quick message to the manufacturer, who sent me the missing copy. However, keep in mind that, technically speaking, the kit was correct, sinceship was commissioned without it (this is apparent in the first photo of the gallery at the top of this page).
Click on a picture in the gallery above to see a full resolution image, or to navigate manually
In summary:
This being only my second resin kit, my only comparison was with the Niko Model's USS Philadelphia. They each have their advantages and disadvantages.
-
Niko's resin is smoother, and easier to work with, which helps with both painting and getting things to fit. Doggy's resin is harder to work with, and in the rare case when the fit is not good, the result is less satisfactory. But, on the positive side, it comes with a lot less flash, out of the box.
-
Doggy's instructions were clearly better. Even when I found myself scratching my hear to figure something out, there was a picture somewhere that made things, if not clear, at least possible. In comparison, Niko's instructions required a lot more trial and error.
-
But where this kit really shines is in the photoetch. Even though I was quite happy with Niko's set for the Philadelphia, this one blows any competition out of the water in terms of precision and ease of use (well, at least, insofar as "ease" can be said, when it comes to folding or manoeuvring into place tiny pieces of metal). And, don't forget the plentiful spares...
This is a challenging kit, but in a positive way. Although definitely for experienced modellers only, I found it very enjoyable.
Click on a picture in the gallery above to see a full resolution image, or to navigate manually


Construction photos
 |  |  |  |  |  |  |
|---|---|---|---|---|---|---|
 |  |  |  |
Click on a picture in the gallery above to see a full resolution image, or to navigate manually
-
It all starts with a lot of detergent, and scrubbing every corner of every part with a toothbrush...multiple times...then immersion with isopropyl alcohol. Essential to avoid masking disasters, later.
-
Hull after sanding and priming. Most of the oblique striping is gone at this stage. A positive side effect of this is that the representation of the armour belt was toned down, to a more realistic impression.
-
I built each level of the superstructure as a sub-assembly. This allowed me to prime and paint them individually, which was much easier in terms of masking. The downside was that this made it more difficult to clamp the warped parts (as mentioned above).
-
Masking the hull as an example. Once the light grey was applied to the vertical surfaces, it was easier to paint the horizontal surfaces in dark grey, without interference of the superstructure levels. The boat cradles visible here were later substituted with photoetch versions (provided in the kit)
-
Then it was time to complete all smaller sub-assemblies. Here are the bridge, main armament, and one of the funnels, for example, after priming.
-
After attaching the first level of the superstructure, and painting. Any defects of the airbrushing could be fixed, at any step, by paintbrush (AK Air 3rd generation ADC grey for vertical surfaces, diluted Mr. Color 36 for horizontal). Here a lot of small resin parts had already been applied to the deck (all painted with ADC grey).
-
Building levels, from bottom to top. The window details in the bridge, and portholes, were made darker with application of Tamiya panel line accent solution (black) using a very fine paintbrush.
-
One of the 40mm guns. This is a combination of photoetch (bent twice...) and resin. You need to do this 8 times...
-
With all sub-assemblies painted and positioned (note: cranes, main and secondary armament, boats) it is time to start with the railing. Starting inside and centre, moving gradually to the periphery.
-
Another picture of the railing stage. I prefer to paint the railing a darker grey, for a subtler effect. Otherwise, it ends up looking over scale, to my eyes. Each little section of railing in this kit came individually labeled and the right size to be applied to its proper place. It was just a matter of bending properly (some of the curves were hard to get "right").
-
With all railing and other details done (note: 40 mm guns, Carley floats, directors, reels) it was time to face the inevitable, and apply those pesky whip antennas and masts. The whip antennas were hard to get aligned, because there is no clear pleace to attach. It is more a case of apply the cyanoacrylate, and hold until they don't fall. Each mast was built as a separate sub-assembly, and painted, before application. To ensure alignment they were first positioned held only by white glue (Micro Krystal Klear), and only then secured more firmly with cyanoacrylate. True to expectations, at this stage I broke off the top piece piece of the mast (including the flag pole) without noticing, and lost it, so this part is absent from this photo. Pictures of the final product in the galleries above include a scratch built replacement.