 |  |  |  |  |  |  |
|---|---|---|---|---|---|---|
 |  |  |  |  |  |  |
 |  |  |  |  |  |  |
 |  |  |  |  |  |  |
 |  |  |  |  |  |  |
 |  |  |  |
Click on a picture in the gallery above to see a full resolution image, or to navigate manually
USS Philadelphia (CL41)
North Atlantic, 1945
Why this ship?
It is hard to understand why major kit manufacturers have ignored the Brooklyn class cruisers. They are absolutely great looking ships, combining a nicely balanced silhouette with no less than 15 6" guns in the main battery*. They were there for the entire duration of the US involvement in World War II, and often involved in the major engagements (only one of the original 9, Helena, was lost in action). And, last but not least, 6 of the class had long postwar service lives in South American navies - including Phoenix, renamed General Belgrano, lost in 1982 to British submarine action in the Falklands campaign. There is a lot of history associated with these ships!
* from Wikipedia: "This gave the class the ability to send up to 150 rounds a minute at its intended target. This allowed the cruiser to smother an enemy ship with fire"
Filling the void left by major kit manufacturers, enters Polish company Niko model. If you are not familiar with their catalog, it is worth a look, given the number of unique subjects they offer. The catch? They are resin models, something I never dared try before...
What was added
What you from Niko models get is shown below, in the Construction photos. The kit comes in a nice, sturdy box that gives you all resin and photoetch parts you need, including metal masts. They even include some extras for parts you are likely to lose to the carpet monster (like those 40mm gun barrels). So, in summary, few add-ons were needed here.
-
Rigging was done with Uschi elastic thread. This was new to me, and so worth the investment that I can't imagine a future without it. It makes the rigging so much easier, by not pulling the masts down as you try to manoeuvre little bits of thread into tight spaces.
-
A small piece of tungsten wire was used to create a jackstaff.
-
There were no decals in the kit. So the pennant numbers came from generic white number decals. I also got some generic US Navy aircraft markings for the 2 Vought OS2U Kingfisher planes (from Starfighter Models).
-
The kit parts were pretty good overall, but comparison with reference pictures showed that many portholes were not represented. They were drilled with a small pin vise.
Click on a picture in the gallery above to see a full resolution image, or to navigate manually
Lessons learned and problems circumvented
-
This was my first incursion into the brave new world of resin kits. After reading advice in internet forums I became absolutely obsessed with washing, and re-washing the resin parts with detergent multiple times, and then with isopropyl alcohol. This seems to have done the trick, as I had no problems with paint detaching when painting the hull. The photo-etched and metal parts were similarly cleaned, and then covered with grey automotive etch primer.
-
For the components of the late-war measure 22 camouflage I used:
-
Hull sides: Mr Color 14 (Navy Blue).
-
Deck and horizontal surfaces: Mr. Color 375 (JADSF Deep Ocean Blue).
-
Vertical surfaces and upper hull: Mission Models MMP-104 (Haze Grey US Navy 5H).
-
-
After mixing paint to get a late war "deck blue", according to internet sources, I found that the resulting colour was almost indistinguishable from Mr. Color 375. I have since adopted this as my proxy for the elusive "deck blue".
-
This was my first attempt at Mission Models paints, and the impressions are mixed. First, the positives: they apply very well with paintbrush, and this blends seamslessly with airbrushed paint. This was a relief given the large number of fine touchups needed in a complex model like this (some parts just can't be reached properly with the airbrush). The pigment is thick, and rarely paint needs to be applied more than once. The negatives? It takes forever to cure, and even then it can be easily scratched or rubbed off. I've since heard that this can be overcome with addition of a polyurethane additive, but this was not disclosed until after I got the paints in the mail, and definitely makes it more complicated. My workaround was to apply the paint with a brush or airbrush (the latter, diluted with the MMP proprietary formula), wait a long time (at least 24 hours, sometimes more) and then cover with thin layers of Tamiya clear gloss acrylic (X-22; thick layers could cause it to run...). Only then it felt safe to manipulate the model. So, yes, it works, but I still wish my favourite brands (Mr. Color, or SMS) would make something clearly labeled as "US Navy late War Haze Grey 5H").
Click on a picture in the gallery above to see a full resolution image, or to navigate manually
In summary:
Niko model kits are the only game in town when it comes to a class of great looking light cruisers with distinguished service in World War II. It was well worth challenging my hesitancy in doing resin kits. They are not harder, just different.
To end on a personal note, as a young kid I had a chance to see the former USS Philadelphia, at the time in service with the Brazilian Navy as the C-11 (Barroso). The old lady was, at that stage, already on her last legs, following a serious 1967 accident in the boiler room, which caused 11 crew deaths.
Cruzador Barroso (former USS Philadelphia) in Guanabara Bay, Rio de Janeiro
Image credit: https://commons.wikimedia.org/wiki/File:C_Barroso_%28C-11%29.jpg


.jpeg)
Construction photos
 |  |  |  |  |  |  |
|---|---|---|---|---|---|---|
 |  |  |  |  |  |  |
 |  |  |  |  |  |
Click on a picture in the gallery above to see a full resolution image, or to navigate manually
-
The kit comes in a sturdy open top box.
-
The packaging is robust, preventing small resin pieces from being lost.
-
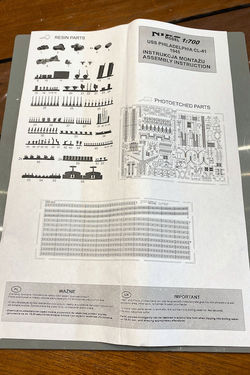
Page 1 of instructions with the parts map. Note a separate photo etch fret for railings, with plenty of spares. Some of the more delicate resin parts (like AA guns) also come with a few spares.
-
Page 2 of instructions.
-
Page 3 of instructions.
-
Page 4 of instructions.
-
The resin parts as they come out of the box. There is a quite a bit of flash everywhere (e.g. yellow arrow). Fortunately this proved easy to remove.
-
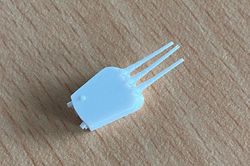
The metal parts as they come from the box. The wire is meant to become the thinner parts of the upper mast. I ended up using tungsten wire, which was straighter.
-
Detail of the forecastle; the decking is represented in fine detail.
-
Detail of midships.
-
Detail of the hull as it comes out of the box. Several issues here. There is some excess resin that needs sanding, the representation of the armoured belt is exaggerated, and there are no portholes.
-
The main part, after problems remedied by sanding, and drilling.
-
First round of painting. The sides of the hull were done (dark sea blue first, haze grey after masking). Then this was covered with Tamiya clear, and masked to allow the application of deck blue. Finally, the vertical surfaces above the deck, by paintbrush. The deck blue was subsequently "weathered" a bit using Tamiya panel line accent (brown) and then wiping most of it out with lighter fluid.
-
Step 1 in the construction of a twin Oerlikon 20 mm mount. Each comes flat as a single photoetch piece.
-
Step 2 in the construction of a twin Oerlikon 20 mm mount. First bend forms the shield.
-
Step 3 in the construction of a twin Oerlikon 20 mm mount. Bend gun barrels over the shield, then the handles.
-
Resin parts often come out of shape. As part of my new skills, I learned how to use hot water and gentle manipulation to remedy problems like this...
-
After adding the superstructure and stacks. The hardest part of this build was securing the main mast, and making sure it was vertical. The instructions were pretty vague with respect to where exactly it had to be inserted. Even after a lot of dry fitting, it was still wrong, requiring me to disassemble the back part of the fore structure, and re-paint. I am still not 100% sure that I did it as it was meant to be, but my solution does not look too far from what I can see in pictures of Brooklyns. By this stage I had added some of the AA guns. My advice: don't, wait until the end. I broke many of them, which had to be repaired or replaced.
-
A few more details added. The aft mast was a lot easier to figure out.
-
Finally - after the railing, rigging, other gun mounts and the catapults. All capped with a coat of SMS flat clear.