 |  |  |  |  |  |  |
|---|---|---|---|---|---|---|
 |  |  |  |  |  |  |
 |  |  |  |  |  |  |
 |
Click on a picture in the gallery above to see a full resolution image, or to navigate manually
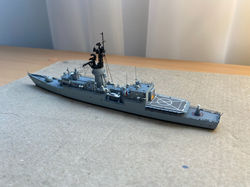
USS Elmer Montgomery (FF-1082)
off the coast of Norway, 1988
Why this ship?
The Knox class frigates were frequent visitors of my home city of Rio de Janeiro, and on a few occasions I had the privilege of coming on board. I have fond memories of these ships designed for the tough job of escorting transatlantic convoys against swarms of soviet submarines, in case the Cold War turned hot.
What was added
-
My initial intention was to build this using an aftermarket set from Flagship models, but realised halfway through the build that this was not worth the effort, particularly with respect to railings (see below). I ended up reverting to many of the kit's original parts, supplemented by generic railing (Big Blue Boy 1/700 USN Modern Railing Vol.I). Arguably, I should have just used the kit and the railing.
-
I added detail to the mast to match photos of Knox class ships in the 1980s, using spare bits of photoetch. The large aerials on top of the hangar, flagstaff and jackstaff were made from tungsten wire.
-
Rigging was done with human hair.
-
This model required a lot of custom printed decals to look right. To avoid having to paint by hand fine white lines on dark grey I created a decal for the helipad marks (see below). I also printed some tiny decals to represent the DesRon12 emblem and E badge on the sides of the bridge. Other home printed decals were needed to correct the sizes of those provided with the kit: the ship's name on the stern (which was oversized as provided) and the red circles around the ASROC launcher and CIWS (which were way undersized).
-
I added an ocean diorama base where I tried to represent the very choppy seas experienced during Exercise Teamwork '88, off the Norwegian coast. Given the sea state I did not think was right to keep the helo on the pad, so I decided to represent it overflying the ship, propped up by a piece of capillary glass.
-
I added a representation of the bridge railing covers, which appear in most of this ship's pictures, using cut strips of baking paper glued with Micro Krystal Klear.
Lessons learned and problems circumvented
Problems with the kit
This is a relatively good and affordable kit, which gives you an accurately proportioned Knox class ship, but is not without its problems. It is a bit light on detail, the painting instructions are practically non-existent, and the decals are a bit hit and miss.
-
The only real big issue with the quality of the plastic were the two big mold sink holes in the forward part of the hull, which became most evident after my first go at painting (Alclad black, followed by SMS haze grey). This required some filling (Vallejo putty), followed by sanding and re-painting. I took the opportunity to cut a notch at the tip of the prow (near where the jackstaff attaches), which is not reproduced in the kit.
The image above shows the sink hole in the bow.
The images on the right show the aftermath of fixing this
problem. After all sanding was done, light grey is the
original plastic, black is Alclad base coat, and white is
Vallejo putty. The notch needed at the tip of the prow is
best seen on the starboard view (top right).
-
Mold sink holes also needed to be filled in some small parts, including the launch and helicopter:
Sink holes on the deck and canopy of the launch (fixed with putty) and on the side of the SH2-F helicopter (not yet fixed). Scale bar in is cm.
-
The other problem circumvented was painting the helipad. After establishing that my manual skills were not sufficient to accurately paint fine white lines on a dark grey surface, and that same manual skills also made impossible to cut accurate masks (particularly for the circle near the centre, and dashed lines), I opted for creating a decal. I started by placing the helipad (part 47) in a flatbed scanner, and getting a high resolution image, which was used as the basis to create the pattern in Adobe Photoshop. This decal was then printed on a laser printer at the maximal resolution, on Expert's Choice clear decal film. It was applied to the part after pre-painting it with AK Interactive white grey (RC003).
Kit part 47 (helipad, on the left) and decals. Just in case I printed a few, at slightly different sizes.
Problems with the photo etch set
The main lesson I learned in this build is that getting a photo etch "upgrade" is not always a good idea. Yes, the kit is a but basic, but the photoetch parts did not help, by being consistently larger than they should be, so I ended up not using most of them. The next few images give an idea of what I mean.
-
The image on the left below shows a comparison between the railings and helipad nets that come in the Flagship Models set (left), and those in the Big Blue Boy "generic" set (right), which was what I used. The first are about 30% larger than they should be (in other words, appropriate for a 1/550 model). The image on the right shows the result of my attempt to use the "upgrade" for the rail in the mack platform. That was the step I started suspecting something was a bit off...this was subsequently ripped and rebuilt.
-
The next image shows a comparison between the helicopter propeller that comes in the kit (painted grey) and the photoetch one. The latter is obviously too thick.
-
Although I did use the photoetch set for the masts and radars, this was only done because I was too far into the build to rescue and re-use the kit's originals. I don't think the main mast looks bad, but it is still larger than it should be. In other words, if you want to build this kit my advice is to stick to the original parts and make the best of them.
Comparisons between real Knox class ships (top, courtesy of Navsource.org) and my model (bottom) suggest that the photoetch mast is somewhat taller than it should be. Top left: the iconic photo of the USS Lockwood (FF-1064) testing the Harpoon missile. Top right: USS Elmer Montgomery during Exercise Teamwork '88.


Construction photos
 |  |  |  |  |  |  |
|---|---|---|---|---|---|---|
 |
Adding the seascape diorama base
 |  |  |  |  |  |  |
|---|
-
I started with a piece of rubber foam, cut to the desired size and with the ships' hull shape outlined and carved out (to 2-3 mm deep) with a scalpel. Because this time I was intending to represent somewhat heavy seas, I also used a large knife to add some undulations.
-
In the next step I used some crumbled aluminium foil to add to the waves, which was attached to the rubber foam base with white glue. After the glue was fully dry, this initial layer (still visible in the top half of the picture) was covered with a single sheet of aluminium foil, which was pressed hard to soften some of the texture while maintaining the undulating appearance.
-
The second layer of aluminium foil has been painted with a base coat, and then layers of Tamiya acrylics, trying to keep the patterns slightly uneven. The main colours used were XF-17 dark sea blue, XF-83 sea grey, and X-23 clear blue, but I also added splashes of any green or blue that I happened to have diluted at the time. Each colour was sealed with floor polish before the next was applied. At some point between colours I added more texture using an acrylic gel, applied with a paint brush (I use Global Colours Professional Regular Gel Gloss). This gel can be used to build up details such as the bow wave and wake patterns. Note that this material is initially opaque, but gradually becomes transparent - so you need to add a final, thin layer of colour on top. In this image you can still see some bits looking a bit milky, by virtue of not being fully dry.
-
Some impression of foamy wave crests is added by dry brushing white (Tamiya X-2). This step can be easily overdone, so make sure you wait for the paint to be nearly dry before running the paintbrush across the wave pattern. At this point it is a good idea to dry fit the ship, and if necessary adjust the niche carved for the hull as needed to avoid having bits completely out of the "water" (which can be a problem for waterline kits like this).
-
The ship and sea base are joined with acrylic gel.
-
As above, after the acrylic gel dries.
-
The final step is to add more dramatic wave effects using bits of cotton, stretched by hand and stuck in place using he same acrylic gel. The trick here is again to do it slowly and carefully, layer by layer, and using a paintbrush to sculpt (for example, adding the splashes agains the hull).